Jun 3, 2019
Do-It-Yourself Renaissance Faire on a Dime
For my parents 50th Wedding Anniversary we wanted to do something special.
But we kind of forgot to do something special, and then time passed really fast and suddenly it was just a couple of weeks away and we were like "Oh no! We ran out of time! Let's just give up and take them to dinner!"
Luckily my sister Faralee said that just dinner was unnacceptable. That, by golly, it was their 50th Wedding Anniversary, and we were going to do something special for them or die trying. (Faralee is SO DRAMATIC sometimes.)
So we threw together an impromptu, surprise, Renaissance Faire (with an E), and had it in my backyard.

For the first time ever my back "yard" full of dirt and weeds was landscape appropriate!
STEP 1: Collect as many Pop-Up Canopies as you could (I guess for us that was a total of 3. More would have been better, but we needed to spend as little money as possible. So 3 was our magical number.)
STEP 2: Dress up the canopies. Everyone donated all the old fabric and sheets they could spare. (It is times like this that it is handy to have so many siblings.) Faralee cut the sheets into these fancy scallop shapes using pinking shears--I'm sure this shape has a name, but I don't know what it is-- and then embellished them with stamps or simple lines.

As you can see from the picture we didn't have time for straight lines, and we just pinned the fabric right on to the canopies and you know what? It looked fine. It even looked kind of awesome. So being a perfectionist doesn't always pay off in the long run.
Then we took other fabric and pinned it too the back of the canopies to make them feel a little more like booths.
We had a tent for the King and Queen (my parents)

A tent for crafts

and a big tent for food.

The bunting along the back there is just made out of paper. Cheap and Easy-Peasy. Well, easy for me. Fae spent hours cutting and assembling bunting, because she is a champ.
STEP 3: Make Some Signs.
Here is a shot of the "entrance" to the backyard. You can never have too much bunting. I know the truck sort of ruins the effect, but what are you gonna do?

Here is a close up of the sign I made:

I bought the banner art, and then filled it in with words and had it printed at a local print shop. Then I taped it to a big piece of felt because that is what I had. It DID NOT work well. Paper and fabric are not great friends when you stick them in the wind together. Faralee also spent some time making some rag bunting, which had a very nice effect, but I don't have a decent picture of it.
Then there is this, cuz why not? Cardstock glued to cardboard, just like in ye olden times.

Why did I write some of the words in all caps and some not? I couldn't tell you.
We also needed a sign on the food tent. I found images of blank wooden signs and added the words. They are just printed on card stock (two pieces that I taped together so they were sturdier and could be read from both sides.)

STEP 4: Make Lots and Lots and Lots of Food.
As you can see we served Meat on a Stick (Brats stuck on a skewer), Chicken Legs, Cobbler, homemade icecream and my sister Faemarie's phenomenal peach pie. We also had corn on the cob, grapes, cheese and crackers and probably some other stuff that I can't remember. I really wish I had a picture, but we ate it too fast.
The chicken was way too much work. It shouldn't have been, but it took forever to cook, and lots of us spent the first half of the party in the kitchen. So figure out something more crowd friendly when you have your own Ren Faire.
STEP 5: Make and Set up Games. Ie.
Nine Men's Morris


I haven't the slightest idea how to play this. Faralee made this too, so I just don't know what to tell you.
We also set up some logs for the kids to stand on and hit each other with sticks.

Whoever stays on longest wins!
And then we had face painting which some of the nieces were more than happy to oversee.

STEP 9 (I lost count. What number are we on?): Invite a Whole Bunch of People!
When my whole family gets together there are about 40 of us, so we're a decent group all on our own. But we also made sure to invite all of my parents siblings who live close enough to come, and some of my parent's good friends.
We told people to dress up if they wanted to.

Some did, some didn't. Harrison put on some church clothes and Colin put on his SWAT costume and it was all fine, and fun and wonderful.
STEP 10: Don't forget to invite the Guests of Honor. Otherwise all your effort will be wasted.
STEP 11: Let the magic happen!
At some point, you must sit back, and let your hasty and inexpensive efforts come to fruition. So you can just enjoy being together. We were fortunate enough that a bunch of nieces and nephews wrote and performed a play, all without any prompting from the adults.


One of the little girls kept calling out from the stage "I'm doing a great job, Mom!"
We all did a great job. In fact, all in all we had so much fun that we talked about doing it again. Maybe every single year.
That was two years ago, and we haven't done it since, but my parents 52nd anniversary is coming up in July. Will this be the year we have another Renaissance Faire? Or will we decide once again that laying around eating Popsicle is a better use of our time? Who knows? Join us in two more years to find out!
But we kind of forgot to do something special, and then time passed really fast and suddenly it was just a couple of weeks away and we were like "Oh no! We ran out of time! Let's just give up and take them to dinner!"
Luckily my sister Faralee said that just dinner was unnacceptable. That, by golly, it was their 50th Wedding Anniversary, and we were going to do something special for them or die trying. (Faralee is SO DRAMATIC sometimes.)
So we threw together an impromptu, surprise, Renaissance Faire (with an E), and had it in my backyard.
For the first time ever my back "yard" full of dirt and weeds was landscape appropriate!
STEP 1: Collect as many Pop-Up Canopies as you could (I guess for us that was a total of 3. More would have been better, but we needed to spend as little money as possible. So 3 was our magical number.)
STEP 2: Dress up the canopies. Everyone donated all the old fabric and sheets they could spare. (It is times like this that it is handy to have so many siblings.) Faralee cut the sheets into these fancy scallop shapes using pinking shears--I'm sure this shape has a name, but I don't know what it is-- and then embellished them with stamps or simple lines.
As you can see from the picture we didn't have time for straight lines, and we just pinned the fabric right on to the canopies and you know what? It looked fine. It even looked kind of awesome. So being a perfectionist doesn't always pay off in the long run.
Then we took other fabric and pinned it too the back of the canopies to make them feel a little more like booths.
We had a tent for the King and Queen (my parents)
A tent for crafts
and a big tent for food.
The bunting along the back there is just made out of paper. Cheap and Easy-Peasy. Well, easy for me. Fae spent hours cutting and assembling bunting, because she is a champ.
STEP 3: Make Some Signs.
Here is a shot of the "entrance" to the backyard. You can never have too much bunting. I know the truck sort of ruins the effect, but what are you gonna do?
Here is a close up of the sign I made:
I bought the banner art, and then filled it in with words and had it printed at a local print shop. Then I taped it to a big piece of felt because that is what I had. It DID NOT work well. Paper and fabric are not great friends when you stick them in the wind together. Faralee also spent some time making some rag bunting, which had a very nice effect, but I don't have a decent picture of it.
Then there is this, cuz why not? Cardstock glued to cardboard, just like in ye olden times.
Why did I write some of the words in all caps and some not? I couldn't tell you.
We also needed a sign on the food tent. I found images of blank wooden signs and added the words. They are just printed on card stock (two pieces that I taped together so they were sturdier and could be read from both sides.)
STEP 4: Make Lots and Lots and Lots of Food.
As you can see we served Meat on a Stick (Brats stuck on a skewer), Chicken Legs, Cobbler, homemade icecream and my sister Faemarie's phenomenal peach pie. We also had corn on the cob, grapes, cheese and crackers and probably some other stuff that I can't remember. I really wish I had a picture, but we ate it too fast.
The chicken was way too much work. It shouldn't have been, but it took forever to cook, and lots of us spent the first half of the party in the kitchen. So figure out something more crowd friendly when you have your own Ren Faire.
STEP 5: Make and Set up Games. Ie.
Nine Men's Morris
I haven't the slightest idea how to play this. Faralee made this too, so I just don't know what to tell you.
We also set up some logs for the kids to stand on and hit each other with sticks.
Whoever stays on longest wins!
And then we had face painting which some of the nieces were more than happy to oversee.
STEP 9 (I lost count. What number are we on?): Invite a Whole Bunch of People!
When my whole family gets together there are about 40 of us, so we're a decent group all on our own. But we also made sure to invite all of my parents siblings who live close enough to come, and some of my parent's good friends.
We told people to dress up if they wanted to.
Some did, some didn't. Harrison put on some church clothes and Colin put on his SWAT costume and it was all fine, and fun and wonderful.
STEP 10: Don't forget to invite the Guests of Honor. Otherwise all your effort will be wasted.
STEP 11: Let the magic happen!
At some point, you must sit back, and let your hasty and inexpensive efforts come to fruition. So you can just enjoy being together. We were fortunate enough that a bunch of nieces and nephews wrote and performed a play, all without any prompting from the adults.
We all did a great job. In fact, all in all we had so much fun that we talked about doing it again. Maybe every single year.
That was two years ago, and we haven't done it since, but my parents 52nd anniversary is coming up in July. Will this be the year we have another Renaissance Faire? Or will we decide once again that laying around eating Popsicle is a better use of our time? Who knows? Join us in two more years to find out!
May 25, 2019
To Read Immediately
My To Read Immediately list is getting a little out of hand.

Actually, no. Most of the books on the left I have read already. I pulled them out for research. The book I'm writing now has a 3rd person omniscient narrator and I wanted to see how it is done in books I love.
So here is my research stack;

And HERE is my To Read Immediately stack:

I stuck them up on my nightstand so I don't forget about them.
I feel I need to distinguish here between a "To Read" list, and a "To Read Immediately" list. The key here is the word immediately. You may not be familiar with it. It is a word meaning AT ONCE, INSTANTLY. It is a self imposed, fast approaching deadline. Which means I really need to be reading these before I do anything else. And honestly it is stressing me out. But what can I do? They are on my nightstand. Books on a nightstand are a binding contract.
And this doesn't even include the the books on my phone I have to finish for my bookclub, and the ones I checked out from Overdrive. Ah!
Let's look at each one shall we? Why not? Do you have somewhere else to be?
Thanks for stopping by for some informative pictures of books! Until next time.
Actually, no. Most of the books on the left I have read already. I pulled them out for research. The book I'm writing now has a 3rd person omniscient narrator and I wanted to see how it is done in books I love.
So here is my research stack;
And HERE is my To Read Immediately stack:
I stuck them up on my nightstand so I don't forget about them.
I feel I need to distinguish here between a "To Read" list, and a "To Read Immediately" list. The key here is the word immediately. You may not be familiar with it. It is a word meaning AT ONCE, INSTANTLY. It is a self imposed, fast approaching deadline. Which means I really need to be reading these before I do anything else. And honestly it is stressing me out. But what can I do? They are on my nightstand. Books on a nightstand are a binding contract.
And this doesn't even include the the books on my phone I have to finish for my bookclub, and the ones I checked out from Overdrive. Ah!
Let's look at each one shall we? Why not? Do you have somewhere else to be?
- Lovestruck by Kate Watson (who also happens to be my cousin-in-law, which you have to admit is very awesome.)
- Neverwhere by Neil Gaiman (Just finished his masterclass, and decided I should probably get around to reading a few more of his books.)
- Mortal Engines by Phillip Reeve (The audiobook is fantastic. I'm about halfway through, but I always struggle to find time to listen.)
- Christmas Jars by Jason Wright. (Yeah. I've never read it. Have you?)
- Minnie Kim: Vampire Girl by Ali Cross (Winner of the Whitney Award for YA Speculative Fiction)
- A Monster Like Me by Wendy Swore (I picked up this book based solely on the title and the cover. Which, um, I don't have a picture of. Sorry.)
- And Then There Were None by Agatha Christie. (Birthday present from my fantastic friend Jeri.)
- Douglas Adams' Shada by Gareth Roberts (I still intend to do reviews of all the books on my book shelf, and this is the next one in line. I stuck it with the rest of my Douglas Adams books, but I THINK it is a book based on a Doctor Who episode written by Douglas Adams? Maybe? I'll let you know after I read it.)
- The Last Unicorn by Peter S. Beagle (The book the 80's cartoon was based on. Recommended by my niece Emily.)
- Shattered Snow by Rachel Huffmire (I met Rachel at a class at Storymakers. She told me about her book and, boom! It magically appeared in my to read pile!)
- Legion by Brandon Sanderson (cuz, obviously)
- The Assassination of Brangwain Spurge by Eugene Yelchin (saw this on overdrive. Checked it out-after a long wait- listened to a bit and loved it so much I had to hold that book in my hands. It has pictures!)
Thanks for stopping by for some informative pictures of books! Until next time.
May 20, 2019
STORYMAKERS CONFERENCE - 2019
My favorite weekend came and went and it was wonderful and now it is over. That is how things work after all. It is sad that it is over, but after two days my brain had reached its maximum information capacity.
There were so many great classes I'm not sure which one was my favorite. I loved Sara Eden's class about the Theory of Mind. It was fascinating. (And I'm not going to go into it now. Look it up if you want to know more.) And Dennis Gaunt's class Simulating the Slushpile was hilarious. He's a slushpile reader for Shadow Mountain and he had a bunch of writers send him stuff showing some common mistakes writer's make. I went because I needed a brain break and it was so, so, so funny. (You can see why I want to be a writer. That description was so vivid I'm sure you feel like you were there in the room with me, don't you?)
Most of my ANWA writing group was there and I loved sitting with them during meals and having stimulating conversations.

I realized during the final meal that I hadn't taken a single picture, so I whipped out my phone and snapped a few.


Then I said, "Take a picture of this side of the table." and handed Alison my phone and then I did this:

Because apparently I struggle posing for pictures like a normal person. Thank goodness I'll always have that photo for posterity.
Before we went home we rounded up as many of us as we could and got a picture altogether.

Now I just have to incorporate all the wisdom that was dumped on me into my writing and I'm sure I'll be an expert in No Time!
Most of my ANWA writing group was there and I loved sitting with them during meals and having stimulating conversations.
Then I said, "Take a picture of this side of the table." and handed Alison my phone and then I did this:
Because apparently I struggle posing for pictures like a normal person. Thank goodness I'll always have that photo for posterity.
Before we went home we rounded up as many of us as we could and got a picture altogether.
Now I just have to incorporate all the wisdom that was dumped on me into my writing and I'm sure I'll be an expert in No Time!
Apr 29, 2019
The Not-Quite-Finished 1968 Kit Companion Travel Trailer
There are gonsta be lots-o-pictures, my friends, so I hope your eyeballs are ready for a world of lookin'!
PICTURE ONE!

There is the dinette, looking stunning in aqua and white. That is the original table, a white laminate with flecks of gold in it which works just fine for me. Sitting on top of it is a plant I stole from my fireplace mantle. It only took one camping trip for me to learn that decorative items are just in the way.


Those two little eagles you see on the walls have little levels in them. I wanted gold/antique brass accents in our Travel Trailer Friend, so I sprayed those eagles with my Antique Brass spray paint and bam, now they are the fanciest leveling eagles (I'm sure they have a name but I am too lazy to look it up.) at the aviary.
Now we have another picture. Tis a picture of the map that I stuck above the window.

Now for the story, and get ready cuz it is fascinating. I found the map for free online. Oh, heck, let me see if I can find it to share with you.
https://mrprintables.com/printable-map-of-the-united-states.html

There you go. I hope you appreciate the lengths I go to. That took me like two minutes. So I printed that out and attached it to a cheap cork board from Walmart. But after one cold night when all the windows were closed and the four of us were breathing all night long (as one does) the paper got all warped from the moisture in the air. So this one is laminated. Printed and laminated at my local print shop for like $5.00 was totally worth it.
Here is a picture of curtains:


PICTURE ONE!
There is the dinette, looking stunning in aqua and white. That is the original table, a white laminate with flecks of gold in it which works just fine for me. Sitting on top of it is a plant I stole from my fireplace mantle. It only took one camping trip for me to learn that decorative items are just in the way.
Now we have another picture. Tis a picture of the map that I stuck above the window.
Now for the story, and get ready cuz it is fascinating. I found the map for free online. Oh, heck, let me see if I can find it to share with you.
https://mrprintables.com/printable-map-of-the-united-states.html
There you go. I hope you appreciate the lengths I go to. That took me like two minutes. So I printed that out and attached it to a cheap cork board from Walmart. But after one cold night when all the windows were closed and the four of us were breathing all night long (as one does) the paper got all warped from the moisture in the air. So this one is laminated. Printed and laminated at my local print shop for like $5.00 was totally worth it.
Here is a picture of curtains:
I made them out of shower curtains I got at Target. This was probably not the cheapest way to go, but it can get moist in there sometimes (as we learned from my previous story about the map), and I figured shower curtains are made to withstand moisture. Plus, this curtain had a really nice textured pattern, so I just went for it. Curtains aren't that complicated to make, but there are a ton of windows in this tiny trailer and it took FOREVER. The grommets were the easy part. Let me see if I can find them on Joann.com. Hang on.....
Ok Here are the ones I used:

They come with a little template to show you what size to cut your circle. The grommets themselves are plastic, and the front and back just snap together. Zip Zap Zooie.
They are a little pricey though, so use coupons. I bought these in a dozen separate trips to two separate Joann stores. I kept buying all they had, which was maybe just as well so I could get them all for at least 40% off.
Here is a light fixture, which clearly isn't big enough to cover the hole it was installed in.
I also painted the base Antique Brass, so it would match everything else.
We wanted everything to be able to run off batteries, but 12 volt light fixtures don't offer a lot of options. However, you can get 12 volt light bulbs. So this light is a regular fixture with a 12 volt bulb in it. Problem solved.
The following picture illustrates two things.
1) RV light switches are adorable.

2) White walls were a bad idea. I love the look of white. But I have kids. I camp with my kids. And they get DIRTY. And it shows. Everywhere. PROCEED WITH WHITE WITH CAUTION.
And here is the kitchen.
It is painted a different color than the rest of the trailer. A slightly off white beigy gray. I'd love to tell you what the color is called, but I can't remember. But it is a lovely color. I wish I did the whole trailer this color. It is just off white enough to hide a lot of fingerprints. The hole in the cabinet wall there is where the original heater went. Which we got rid of. We'll have to cover that hole at some point before we can count this thing as done.
The tiles for the backsplash we got on Amazon.
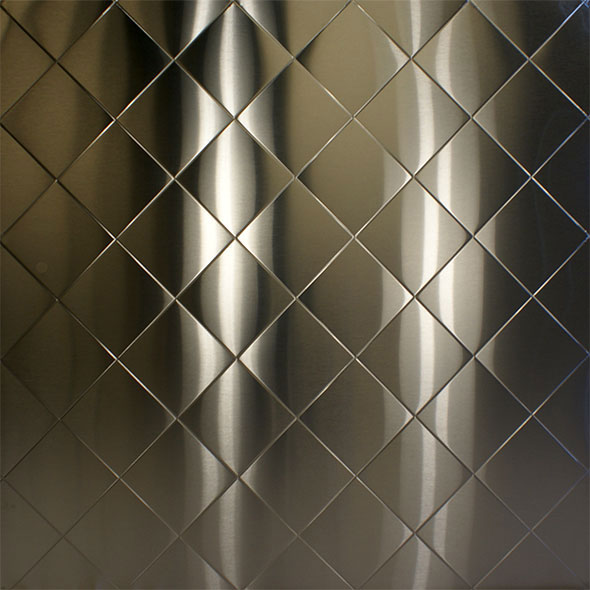
I still need to put some kind of trim on each edge of this back splash, but I haven't decided what yet. They are sticky back, so theoretically easy to install, but it was still a fair amount of work. What I should have done was this:
That is a sheet of stainless steel Diamond Quilted. You can buy it online at the link above, or check at some local sheet metal supplier for a better price. I bet they would do it for less than I bought those tiles for, and install would be a snap.
The other thing to note is that in the 1968 Kit Companion, on the face of the cabinetry in front of the sink was just a big blank space. See:
So I found a towel rack that fit in the space, painted it Antique Brass, and voila.
Let's turn around and look at the other wall.
More cabinets. All the cabinet pulls are original. Except I hit them with my trusted Antique Gold Spray Paint. You probably saw that coming, didn't you?
I was gonna put Wallpaper on that wall, but I am too cheap. So I drew it using a gold paint pen.
Behold my mad measuring and marking using a straight edge skills!
Here's some of the original paperwork we found in the trailer, laminated to protect it.
Next we've got the section of the trailer still needing the most work.
The back bench and bunk bed. All these cushions still need to be upholstered. I have the fabric and everything, I just really don't want to do it. The board that makes up the bunk bed also hasn't been painted for some reason. That's another thing that I don't want to do, but I'm going to have to suck it up and paint it eventually.
Also note, this board that goes across the bed cracked and will have to be replaced.
BOO.
The lighting and USB outlet over the back bed:
At some point I just gave up finding light fixtures in gold and spray painted everything. Everything!!
Here is another view of the finished half of the trailer.
And here are more unfinished things.
In the spot where that board sits should be a hatch that opens into the space under the back bench. In case you don't remember, here it is when we bought it.
That door was just particle board covered in sheets of metal. So, what with the weed farm growing in the back of the trailer the door also completely fell apart.
Then there is the hole where the vent for the heater came out.
Another place we handily covered with some wood. Fancy!
Last of all we need to paint.
But that is at the very bottom of the list, for reasons that I hope are obvious. That's all. Thanks for donating your eyeballs to this endeavor. I'm going to have dinner now. Toodles!
Subscribe to:
Posts (Atom)
